Showing posts with label boiler. Show all posts

Sunday, February 16, 2014

How to Identify Your Hydronic System


Ciculator pumps.
There are good reasons to understand the basics of your hydronic heating system, even if it’s just knowing how to identify what type of system you have. It helps the service technician when you can tell him what type of service call he’s responding to and he can troubleshoot more effectively. It also helps you weed out the inexperienced service technician or contractor. I’ve even seen home inspection reports that went into great detail about a home’s hot water heating system that turned out to be steam. True!

Starting with the question, Is this steam or hot water?, let’s go down to the boiler room.

A hot water heating system usually works by pumping heated water through a system of pipes, to the radiators, and back to the boiler. A dead giveaway to the hot water system is the pump. There are a few old hot water systems out there that don’t use pumps, but by-and-large, most have a pump. And frankly, if you have a hot water system that’s old enough to be “gravity” operated (without a pump), you should be thinking more about identifying its replacement.

Steam boiler with gauge glass.
A steam system would rarely have a circulating pump. There are some steam systems that use the hot water below the boiler’s water line as a heat source for a domestic hot water circuit or small heating loop, but they’re fairly uncommon.

A steam boiler should always have a gauge glass on the side of the boiler. This allows you to see the water level in the boiler. A hot water boiler doesn’t need this because the whole system is (or should be) full of water.

Now let’s say you’ve straightened out your home inspector on the fact he’s actually looking at a steam boiler. But now he’s too intimidated to ask if it’s a one-pipe or two-pipe system. You’ll want to volunteer this information. We need to get out of the boiler room and head upstairs for this.

You can usually tell a one-pipe from a two-pipe steam system simply by looking at the radiator. One-pipe will have just one pipe connected to the radiator and two-pipe will have two. It’s that simple. But it’s an important distinction. The two systems operate very differently and require a different mindset for troubleshooting.

One-pipe steam radiator.
Another distinction between the one-pipe and two-pipe steam system is that the one-pipe should have an air vent on the side opposite the steam inlet. But you need to be careful with this one — I’ve seen some underperforming two-pipe systems “fixed” by adding a vent to the radiator. It’s a bad idea, but they’re out there.

Most (not all) two-pipe systems will also have a steam trap on the radiator outlet. This is the device that can fail and cause the inexperienced service technician to put an air vent on a two-pipe radiator!

Two-pipe steam radiator.
So there you have it. Now when you call for service, you can tell your service technician exactly what type of system you have and help them better diagnose your service problem. (Or impress your home inspector.)

Heidronically yours,

Wayne

Sunday, February 9, 2014

It's a Numbers Game


A heat-loss calculation is where it all starts. It’s the basis for sizing any new or replacement system. It’s a roadmap to a well-designed, high-performing and comfortable heating system. And it’s not hard to do. It just takes some time and a little patience.

First, I measure each room ­— length, width and height. I also measure windows and doors and categorized them by construction type. Then I check the quantities and location of insulation. Usually I make a sketch to scale. For the average home, it takes about two hours to accomplish.

Next, I enter those measurements into a worksheet or use specialized software to produce a room-by-room and whole-house heat-loss calculation. The resulting numbers are the amount of heat lost by your house on the coldest days of the heating season.

These calculations tell me (or another heating designer) what size boiler or furnace is needed. It gives me the information I need to determine how much heating element or how many ducts are needed in each room — or how hot the water needs to be. Or what the flow rates need to be. And the pump sizes, pipe diameters, tubing spacing, panel size, and on and on and on.

Without a heat-loss calculation, it’s all guesswork. Luck. A wing and a prayer.

This is your heating system. The one you’ll be living with and fueling for the next 15, 20 — even 30 years. Ask for it. Demand it. Accept no shortcuts.

Heidronically yours,

Wayne

Sunday, February 2, 2014

Get to know your steam boiler’s probe-type low-water cutoff.

--> -->
Last week I discussed how to check the mechanical low-water cutoff on your steam boiler. However, more and more new steam boilers are equipped with “probe-type” low-water cutoffs that use an entirely different mechanism to detect a low-water condition and shut down your burner before an unsafe condition occurs. (For more on that, see this post on the evolution of the low-water cutoff control.)

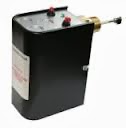
The typical probe-type low-water cutoff is threaded into a port on your steam boiler provided by the boiler manufacturer specifically for this purpose. It’s below the normal water level but just above the level of the bottom sight-glass port. This type of low-water cutoff operates by monitoring the electrical continuity of the boiler water. Simply put, when the probe is exposed to water, it allows the burner to operate. And when it’s exposed to air (as in a low-water condition) it does not.
McDonnell & Miller PSE-800

Some probe-type low-water cutoffs allow the burner to operate for a little bit after they sense a low-water condition — usually about 30 seconds. This is to prevent nuisance shutdowns due to temporary conditions, such as foaming or slow return of system condensate. A flashing light on the low-water cutoff control enclosure usually indicates this type of condition. If the probe senses water again within the 30-second window, the light will stop flashing and the burner continue firing without interruption.

Probe-type low-water cutoffs are either manually or automatically reset. Most residential steam boilers use automatic reset to let the boiler continue heating once the low-water condition is corrected — as when an automatic water feeder is used. A manual reset would require human intervention — a strategy that may not be in your best interest if the boiler were to shut down on low water when you’re away for a few days during the winter.

With either type, you can periodically check the device’s electronics by pressing and holding the test button while the burner is firing. A light will usually flash for a period of time and then the burner will shut down. Releasing the test button should start the burner and return the system to normal operation.

A probe-type low-water cutoff doesn’t require the same weekly maintenance as its mechanical cousin. But during the annual maintenance of your system, I’ll check your cutoff by lowering the water level to simulate an actual low-water condition. And every five years, I’ll remove the probe for cleaning and inspection. If your probe is older than 10 years, I should replace it for you.

With just a little attention, your probe-type low-water cutoff should provide years of reliable protection for your steam heating system.

Heidronically yours,

Wayne

Sunday, January 26, 2014

How to Test Your Steam Boiler Mechanical Low-Water Cutoff


Probably one of the most common low-water cutoff controls used on residential steam boilers is the McDonnell & Miller Model 67. It’s a mechanical control that uses an internal float to monitor your boiler’s water level. A drop in water level lowers the float, activates a switch and shuts down the burner as a safety measure. Otherwise, without enough water, a boiler can dry-fire and create a dangerous condition. (See last week’s post for more on why we use low-water cutoffs.)
McDonnell & Miller # 67

All mechanical devices are subject to failure at some point. The low-water cutoff can accumulate rust and sludge that impedes the movement of the float. If too much debris accumulates and the float can’t drop during a low-water condition, the control can fail to operate when you need it most.

A simple weekly test you can do yourself can make a huge difference in the reliability of your low-water cutoff. Combined with a more thorough annual maintenance and scheduled replacement (every 10 years), you can be confident that your low-water cutoff will be ready when or if you need it.

Weekly maintenance involves “blowing down” or flushing your low-water cutoff by opening the lever-operated ball valve to flush out the sludge, rust or other debris.

Here’s how:
1.     You’ll want a 2 – 5 gallon bucket — preferably metal. The water you’ll be flushing is VERY HOT and can deform a plastic bucket.
2.     Verify the boiler water level is at its normal level. Adjust it if necessary by activating your water feeder or opening the manual fill valve.
3.     Turn up the thermostat so the boiler’s burner is firing during the test.
4.     Open the valve on the bottom of the low-water cutoff completely.
5.     Watch the water level as it drops in the gauge glass. (This is the glass tube on the side of your boiler that shows the water level.)
6.     As the water level drops to near the bottom of the gauge glass, the low-water cutoff should shut down the burner. (If it doesn’t, have it serviced immediately.)
7.     Close the valve and refill the boiler to its normal water level.
8.     The burner should relight.
9.     Reset the thermostat to its normal setting.

That’s all there is to it. Feel free to comment if you have any questions or would like to share your low-water cutoff experience. Good luck!

Hydronically yours,

Wayne

Sunday, January 19, 2014

Your Low-Water Cutoff


Today’s boilers incorporate many controls to improve safety. And, arguably, the most important of those is the low-water cutoff.

In the late 1800s and early 1900s boiler explosions were not uncommon. Thousands died or were injured in the name of central heating. To be sure, there were many causes for these boiler incidents, but the most common was the low-water condition.

Boilers could lose their water through leaks or evaporation. When they did, the boiler metal would overheat. Then, either manually or through an automatic feeder, water would be added to the hot boiler. When this happened the water would immediately flash to steam. And as water turns to steam, its volume expands over 1600 times — which quickly over-pressurizes the boiler and results in a catastrophic failure.

In the early 1900s the issue of boilers losing water through leaks in their return piping was addressed by one of the largest insurance companies at the time. The Hartford Insurance Company had to pay many of the claims that resulted from these boiler explosions so they developed a piping scheme that kept water from escaping from the boiler in the event of a return-pipe leak. It became known within the industry as the Hartford Loop.

The Hartford Loop reduced boiler failures caused by return-pipe leaks, but it didn’t address other low-water situations such as a boiler crack, evaporation, or water-feeder failure. Boilers at the time needed human attention and intervention to maintain a safe water level. Even a short period of inattention could have disastrous consequences.

In 1926 McDonnell & Miller Co. introduced the first low-water cutoff. It was an automatic device that monitored the boiler’s water level and shut down the fuel supply before the water level dropped dangerously low. Combined with an automatic water feeder, the system keeps a boiler running safely with much less personal attention. It’s also saved countless lives.

Today, low-water cutoff controls are considered standard equipment on steam boilers and most hot-water boilers. They provide a level of safety and peace of mind that we’ve come to expect from our heating systems. But they still need some attention and a little routine maintenance to remain reliable safety devices.

In my next post, I’ll talk about things you can do to improve the safety and reliability of your low-water cutoff control.

Heidronically yours,

Wayne

Sunday, January 12, 2014

Less is More

-->
Turn it down. Turn it way down.

I’m referring to the pressure setting on your steam system. The single easiest thing you can do to improve the performance, comfort and fuel economy of your steam heating system is to reduce the pressure. It should also be the first thing you do when things aren’t working right.

It’s tough to do. It seems counterintuitive. That back addition or attic bedroom isn’t getting enough heat, so it seems to make sense to turn up the pressure to force the steam into the far reaches of your system. But it seldom works. And what’s worse, it usually creates even more problems.

Most of the components in your steam system operate best within a range of pressures. Take main air vents, for instance. They come in lots of shapes and sizes AND pressure ranges. I was recently in a home with end-of-main vents that weren’t working properly. They seemed to vent OK at the beginning of the cycle, but appeared to stop working before the main was completely vented.

As it turns out, these particular main vents are designed to operate at less than 3 PSI. At higher pressures they close off tightly ­— rendering them essentially useless. A check of the pressure control had the system set at 7 PSI. So as the steam pressure rose inside the pipes, the vents worked until the pressure got to 3 PSI, then they’d stop venting. Since this was a one-pipe system, the radiator vents had to do double duty venting the rest of the main, all of the risers and the radiators.
A standard Honeywell Pressuretrol
This meant the radiators farthest from the boiler were not getting much heat. By the time the radiator vent in the attic allowed steam in, the radiator in the dining room (where the thermostat is located) had been full of steam and heating for some time.  It satisfied the thermostat and shut the boiler off just as the attic radiator was getting started.

When I turned the pressure down at the boiler, the main vents were able to completely vent the mains and allow the radiator vents to get back to work, venting only the risers and radiators. That’s when the attic radiator finally got some steam and heated the previously unusable attic space.
 
It can be worse on a two-pipe vapor system, as this usually has just one vent at the end of the dry return. If this single vent shuts off on pressure, everything stops heating. But the boiler keeps firing, trying to raise the pressure — wasting fuel.
A Honeywell Vaporstat
So what pressure is right for you? I haven’t met a residential space heating system yet that needed more than 2 PSI. And many need even less. In fact, on most of the replacement boilers I install, I routinely discard the factory pressure control that comes with the boiler and replace it with a Vaporstat. The factory-supplied device can only control the pressure down to 1PSI.  A Vaporstat regulates the pressure in OUNCES, which allows me to control the system at LESS than one pound of pressure — usually between 4 and 10 ounces. This can save a significant amount of fuel while improving comfort AND system performance.

Heidronically yours,

Wayne

Tuesday, December 31, 2013

The Abominable Steam Boiler


One of my favorite holiday TV specials is Rudolf The Red-Nosed Reindeer. I love the part where Hermey tames the Abominable Snowman by fixing his toothache. It got me thinking about steam heating systems. (Yes, that’s the weird way my mind works.) Like the Abominable they’re often misunderstood and lonely.

Your steam heating system can seem mysterious and sometimes even a little scary or creepy. This large hunk of metal sits in the dark recesses of your basement making odd hissing, panting or clanging sounds. Every so often it rumbles to life and sends heat upstairs to the rest of the house, but mostly it’s the reason you don’t like going down “there.”

It doesn’t mean to be so scary. It’s just lonely and needs a little love and understanding ­— like the Abominable. Once you get to know him, you’ll realize he’s a softy at heart and he just wants to be helpful and accepted.

If we’re going to get to know this monster, we should probably start at the heart of the system. The boiler is where the heating cycle begins and ends. In its simplest form, it’s a hollow block of cast iron with a burner underneath. It’s partially filled with water that the burner heats up to a boil (hence, why it’s a “boiler” and not a “furnace.”). When the water starts to boil it creates steam. The steam exits the top of the boiler through pipes that distribute the steam to all of the radiators in your house.

The radiators give up the heat of the steam to your rooms, which cools the steam to the point that it condenses back to water in the radiator. The water now drains back through pipes to the boiler and gets heated back to steam in a cycle that continues until your house is warm enough and the boiler shuts down until your thermostat calls for heat again.

The combustion byproducts are safely vented through the chimney and out the roof. It’s a simple and elegant process that repeats itself over and over for many years —making you warm and comfy and not asking for much in return.

When things are working right it’s quiet and efficient. When they’re not, it can be loud, uncomfortable, inefficient and just plain grumpy. Like the Abominable, sometimes it needs some attention to keep it content.

We’ll talk more in future posts about some different types of steam systems and some simple things you can do to keep your Bumble humble.

Happy New Year!

Heidronically yours,

Wayne